
Getting Started
This page will outline how to get a working mod that will simply log a message to the console when the game starts.
For this guide we’ll assume you already have the Outer Wilds Mod Manager installed.
Choosing an IDE
Section titled “Choosing an IDE”An IDE will help provide the ability to create, edit, and build your mod.
The recommended IDE for modding is Visual Studio.
On Linux (or if you just don’t want to use Visual Studio), use the “Other Editors” tab to get instructions for a non-VS developer setup.
Editor Setup
Section titled “Editor Setup”Head to the Visual Studio downloads page and select Community if asked what edition to install. After downloading and launching the installer, follow instructions until you reach this screen:
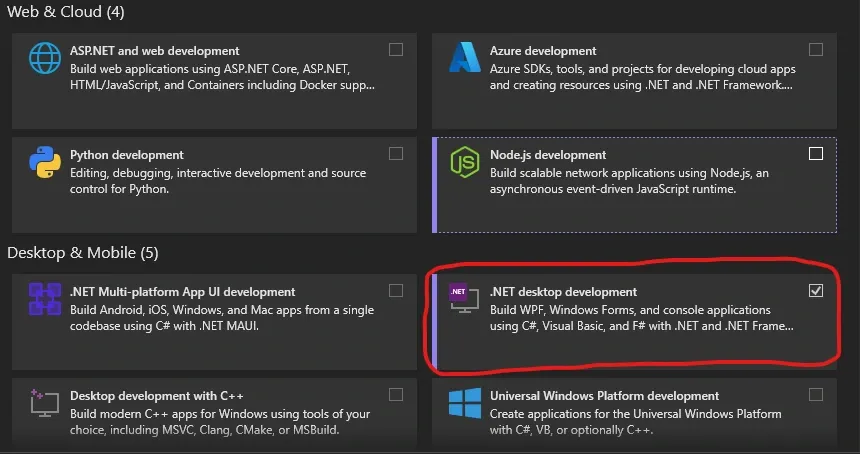
We want the “Desktop development with .NET” module, this will provide us with the tools we need to build the mod.
After installing Visual Studio, launch it once and then close it, this will ensure certain files are generated.
If your editor supports LSP, I’d recommend the C# language server. It’s based on Roslyn which is the same “engine” Visual Studio uses for C#.
You will also need a .NET toolchain available.
- On Windows, follow the “Visual Studio” setup tab to install .NET framework via the Visual Studio Installer
- On Linux, it will depend on your distro. Follow the .NET install guide
Installing the Template
Section titled “Installing the Template”We provide a template to make creating mods easier, this template will handle renaming files and changing the manifest.
To install the template, open a terminal and run the following command:
This will give an output similar to this:
Using the Template
Section titled “Using the Template”This will depend on what editor you’re using
Open Visual Studio and select “New Project” from the welcome screen. Then search “Outer Wilds” and the template should appear in the list.
Set the project name to the name of your mod, please note this should NOT have spaces or special characters in it. The standard casing for projects is PascalCase, which involves capitalizing the start of every word and removing spaces.
On the next screen, set the author name to the name you want to appear in the manager and on the website, this should also not contain spaces
Finally, click “Create Project”
You’ll need to create a project via the dotnet new CLI.
See the Outer Wilds Mod Template README for a list of options.
General Mod Layout
Section titled “General Mod Layout”The general layout of an Outer Wilds mod is as follows:
DirectoryYourProjectName/
- default-config.json
- manifest.json
- YourProjectName.cs
- YourProjectName.csproj (Hidden in Visual Studio)
manifest.json
Section titled “manifest.json”This file contains metadata about your mod, such as its name, author, and version.
YourProjectName.cs
Section titled “YourProjectName.cs”This file should have been renamed to your project name, it acts as the entry point for the mod.
default-config.json
Section titled “default-config.json”This file is used by OWML to generate the settings menu for your mod, we’ll go over it in another guide
YourProjectName.csproj
Section titled “YourProjectName.csproj”This file tells Visual Studio about your project, it determines stuff like dependencies and versions, you shouldn’t need to touch this. If you’re using Visual Studio, this file won’t be explicitly listed. Instead it will be the parent of all files in the project.
The ModBehaviour File
Section titled “The ModBehaviour File”Double-click YourProjectName.cs, and it should open up in the main editor pane.
This file should contain a class that has the same name as your project and some methods within that class.
The class this class inherits from is ModBehaviour, which is a special MonoBehaviour that not only marks a class as the entry-point for a mod, but also provides various utilities and overridable methods.
We’ll focus on Start(). In this method we do two things:
- We output a message to the console alerting the user that the mod has loaded
- We subscribe to the scene loaded event to output a message to the log when the SolarSystem scene is loaded.
You may have noticed we use the ModHelper field to achieve console output, ModHelper is a collection of utilities your mod can use to do a variety of things. It’s covered in the “Mod Helper” section of the site.
Building The Mod
Section titled “Building The Mod”Now that we know what the mod should do, let’s make sure it does it. Building your mod should be as simple as pressing “Solution -> Build Solution” in the menu bar
You should just be able to run dotnet build. If not try running dotnet restore first. You may need to get the Mono runtime.
Running The Mod
Section titled “Running The Mod”Now the mod should have appeared in your mod manager at the very bottom, notice how the download count is a dash.
Your mod should now be ready to run!
Click start game and wait for the title screen to load in. Now search your manager logs (there’s a search box) for a message along the lines of “My mod YourProjectName is loaded!”. This means your mod was loaded successfully! You can also try loading into the main game and checking the logs for another message from your mod.
Getting Line Numbers
Section titled “Getting Line Numbers”If you want to know where errors are happening in your mod, you can download the Line Numbers mod to make error messages include them!
You must build your mod using the “Debug” release candidate for line numbers to appear.
Next Steps
Section titled “Next Steps”You’ve successfully created and built your first Outer Wilds mod, moving forward may require a bit of knowledge in unity and will depend on what exactly you’re trying to do. You may want to read the following guides to get an idea of how to make your mod: